How to setup 2-Factor Authentication for GUI & SSH login | Google Authenticator

“Thought of security is a symptom of hidden insecurity in your mind”. We live in a world where data is one of the most important assets and risk of data loss always keep on swinging on our head like a pendulum. Therefore, We should seek and make every possible attempt to secure and authenticate our data. To avoid this threat administrators prefer to keep hard and complex passwords for login to their servers and machines, but imagine if you can take this login attempt one more step further? Are you wondering if it is possible? Yes, It is possible. Thanks to “Google Authenticator”, using Google authenticator you can set up “2 Factor authentication” for GUI & SSH login of you Linux Machine as root and sudo users.
I will walk you through the process of setting up 2-factor authentication. It’s very easy to setup authenticator on your machine. I am using Ubuntu 16.04 server image for demonstrating this setup. Setting up Google authenticator is like a “two-edged sword” one very important things which I want to bring in notice is that, after enabling 2-factor authentication you would require “Security PIN” generated by Google, and for that you have to pull out your smartphone every time, when you attempt a login to your machine.
Requirements
We have to pull together two things while setting up 2-factor authentication.
- Installing the Google authenticator app 0n your smartphone.
- Installing the authenticator on Linux machine.
Installation Steps & Instructions
- Installing the Google Authenticator app in your smartphone.
- Open the Google Play Store on your smartphone.
- Search for Google authenticator app by Google Inc.
- Tap Install and Accept Terms & Conditions

Google Authenticator
- Allow the installation process to complete.
Now, Let’s begin with the authenticator installation on Linux Machine.
- Open a Linux terminal window.
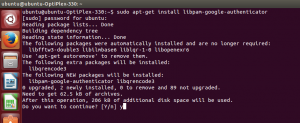
- Run the command sudo apt-get install libpam-google-authenticator
ubuntu@ubuntu-OptiPlex-330:~$ sudo apt-get install libpam-google-authenticator
- Enter the sudo password and start the installation process.

Authenticator Shell Installation
- Allow the installation to complete.
Configuration
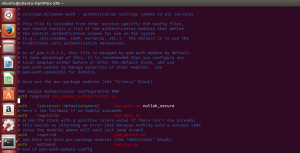
To integrate the authenticator with Linux machine, we should edit one file: /etc/pam.d/common-auth.
- Open the file with your preferred editor, I am using vim to edit the file.
- Search for the line listed below in file /etc/pam.d/common-auth
auth [success=1 default=ignore] pam_unix.so nullok_secure
- Just above this line add the following:
auth required pam_google_authenticator.so
- Save and close the file.

Google Authenticator Configuration
Setup
Yay, this brings an end to the configuration part. Now its time to set up the google-authenticator for every user on the system (otherwise, they will not be able to login). I am presenting an example for ubuntu user, as there is no other user on my system.
- Open the terminal window.
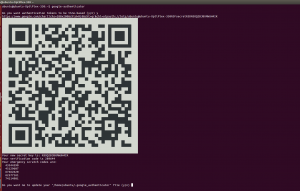
- Run the command google-authenticator.
ubuntu@ubuntu-OptiPlex-330:~$ google-authenticator
- As you hit the command, You will be prompted with series of questions (each of which you should answer with a y).
- After pressing the first y, you will be provided with a bar-code, secret key, verification code and emergency scratch codes.
- Save the secret key, verification code and emergency scratch codes on secure & multiple places.
- You can scan the above-generated barcode with your Google authenticator mobile app and set up the authenticator.

Scan Bar Code
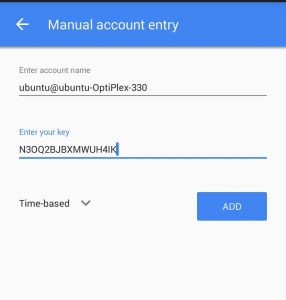
- You can also provide the secret key along with the username of your system manually to set up the authenticator. For Example:
My username is: ubuntu@ubuntu-OptiPlex-330
My Secret Key is: N3OQ2BJBXMWUH4IK

Manual Account Entry
- Click ADD after adding values to your username and secret key.
- Use Emergency scratch codes if you do not have your phone (each code is a one-time use only).
Verification
Finally, Installation configuration and setup of 2-factor authentication comes to an end.
Attempt Login | Enter Verification Code

Attempt Login | Enter Verification Code
Now, whenever you try to make a login attempt to your Linux machine it will prompt you for 6 digit verification code. You have to copy and enter the verification code from Google Authenticator app, before entering your password, in order to make a successful login to your machine. Hope this will bring peace to administrators and the person responsible for security and data management.


You can do all this centrally for many machines in your environment without storing keys on the local machine. The solution above is nice for a single laptop but does not scale beyond that. You can use SSSD on the client and FreeIPA on the server to do the same at scale. FreeIPA is, well, free and SSSD is a part of every Linux distro nowadays. FreeIPA supports any TOTP/HOTP token which means Google Authenticator, FreeOTP, Yubikey and others.
Information how to install IPA and SSSD can be found in public Red Hat docs or on freeipa.org. Red Hat’s version of FreeIPA is called Identity Management in Red Hat enterprise Linux.
@Dmitri, thanks for educating us all regarding IPA and SSSD. I have found the link very useful.
http://www.freeipa.org/page/Main_Page